gis
Step 1: Sharing your data files
For this part of the lab, you are required to upload a map package of your campground project to Canvas. The instructions are below.
We also include instructions for creating geodatabases and uploading your work to ArcGIS online - for reference.
Creating a Map Package
- To create a map package, first organize your table of contents and map display the way you want it to appear and Save the project.
- Then File > Share As… > Map Package
This opens the Map Package wizard.
- Save the Map Package to a file and navigate to the location to which you want to save it.
- Press the “Analyze” button - top right.
This opens a helpful window that tells you which bits need to be added to your map before it can be shared.
-
Double click on each row, and make the changes the ‘alert’ tells you to make
-
- This will be things like creating tags, describing the map, etc.
-
Press Analyze to reevaluate the map document.
- When all issues have been cleared, Press the “Share” button - top right - and wait.
That’s it for Step 1.
Scroll down to Step 2~
For reference:
Creating Layer Files
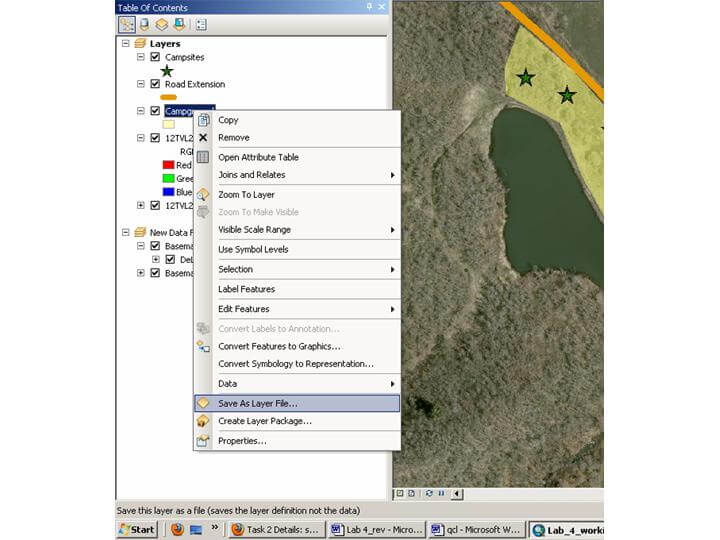
Remember: creating a layer file for your shapefile is done by right clicking on the file in the ArcMap table of contents and selecting ‘save as layer file’ (Figure 2). You should read up on layer files and layer packages and understand their functionality and how to save them here.
If you were zipping the shapefile in a folder for sharing, the important thing to remember is that there are many dependent files that make up one shapefile. ArcMap and ArcCatalog hide these file extensions behind an alias (Figure 3). When zipping files, be sure to capture all of the dependent files associated with each shapefile or the shapefile will not display properly (or at all). Best practice is to put all files to be zipped in a folder while in ArcCatalog, then zip that folder in Windows. Also remember that you might not be able to zip your files if they are open in an ArcMap project. (FYI)
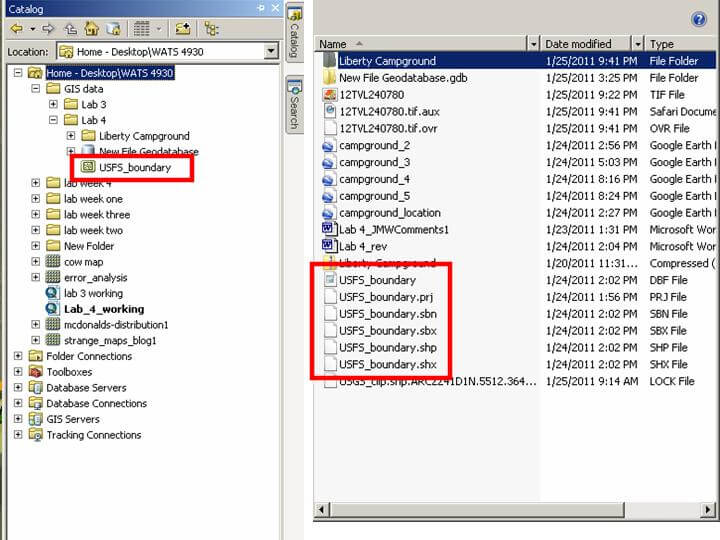
Figure 3: The image on the left shows how ArcCatalog displays the file: USFS_boundary. The same file appears as six dependent files in Windows Explorer.
Creating Geodatabases:
You should already know how to create a file geodatabase from previous labs, but just in case:
- in ArcCatalog, right click on the folder you want to put it in, select New > File Geodatabase.
You can’t copy and paste into geodatabases, you must right click on the Geodatabase and use the Import command.
Exporting an attribute table to Excel: To save your campsite attribute table as an excel spreadsheet, open the attribute table and in the Options drop down menu select ‘Export’ (Figure 4). Note some folks have had trouble exporting from attribute tables.
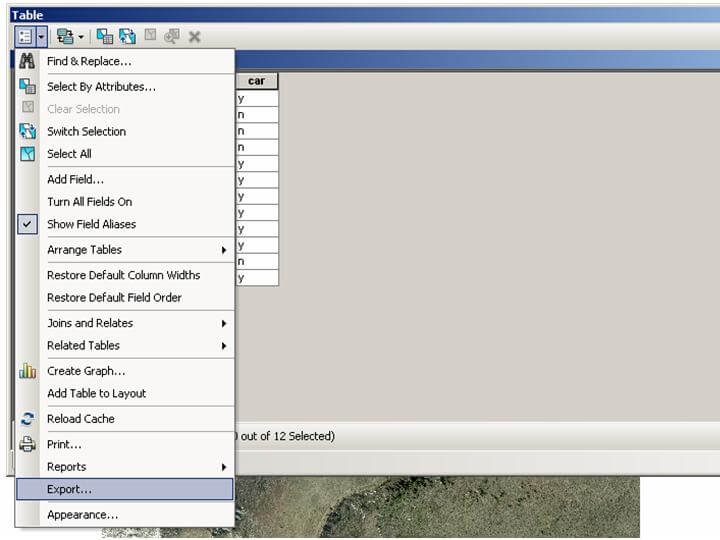
Figure 4: Export option in the Table Options drop down menu for the campsite attribute table.
A dialogue box opens prompting you to choose which records you want to export - the default is All Records, which is what you want to do in this case.
It is important that you click the Browse button to select the folder you want to save the table to, even if the correct location appears in the window. Choose the correct location and name the output table. Then select Text File from the Save As Type drop down menu (Figure 5).
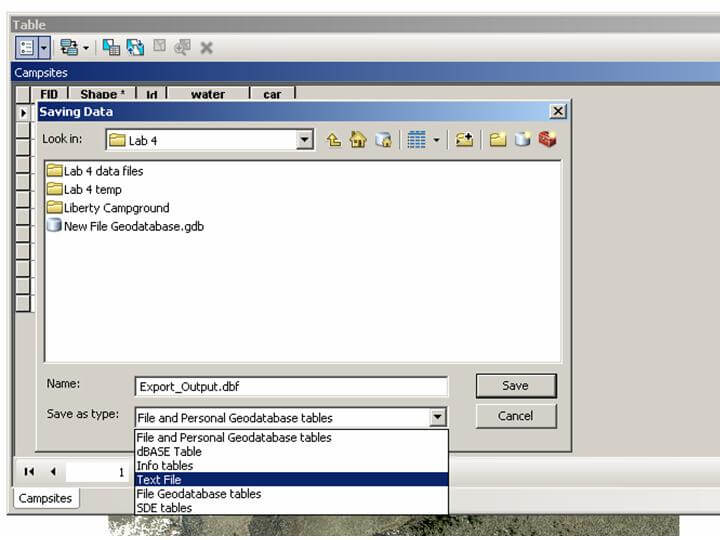
Figure 5: Specifying Save as type - Text File for your exported attribute table.
Click *OK *and *OK *in the Export Data dialogue box.
Open Excel and from the File drop down menu select Open. Browse to the folder you put it in and on the bottom of the screen in the File Of Type window, choose Text Files or All Files (Figure 6).
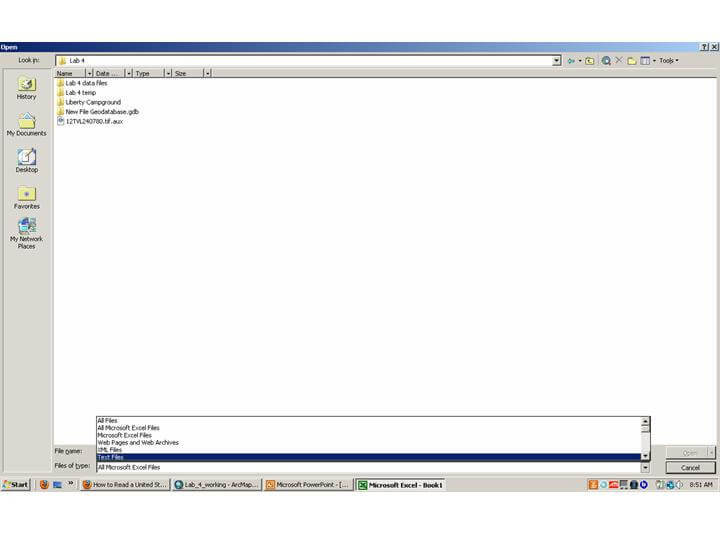
Figure 6: Changing the Files of Type window to Text Files or All Files when opening your attribute table text file.
Select your campsite text document. This file needs to be converted to a spreadsheet format, so a dialogue box opens prompting you to select the type that best describes your data. You want the default - delimited. Click Next. Step 2 of the setup wizard gives you the option to choose the way your data is organized. I usually toggle these boxes (space, comma, etc.) on and off until I have columns set up the way my original table was set up (Figure 7).
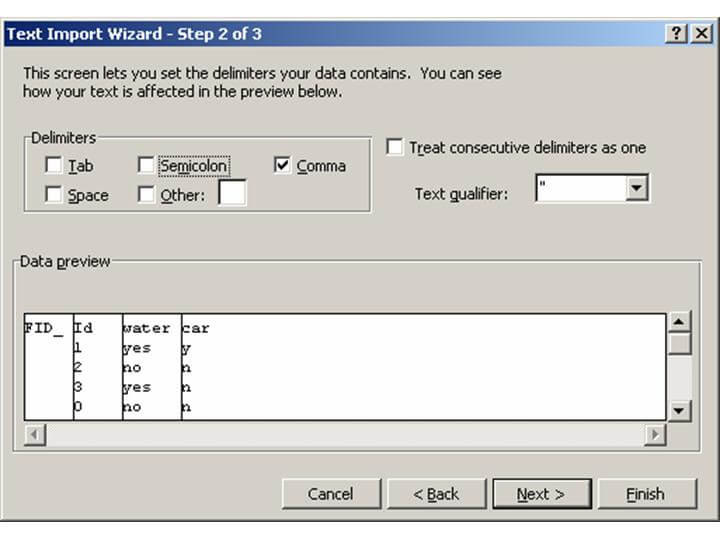
Figure 7: Proper delimitation of data in Excel’s Text Import Wizard.
Select Next and then Finish. You must save this spreadsheet as an Excel spreadsheet or it will revert back to the text file format. You can now doctor this up as you see fit and add it to your Lab 4 webpage. Remember to add the following information (minimally):
- Campsite Number (different than the FID)
- What side of the lake the campground is on (north, south, etc.)
- Type of water recreation access (e.g. Lake, Stream, Lake & Stream, None). Since all campsites are within walking access to such resources, this attribute is intended to specify whether the campsite is directly adjacent to such access.
- Whether it has a parking spot (road access).
-
Uploading to ArcGIS Online
You can share your data on ArcGIS Online.
Click here for the ESRI instructions on saving Layer Packages.
Remember, it is possible to ‘group’ files in your ArcMap table of contents by holding the control key while selecting layer files, right clicking and selecting ‘group’. This might come in handy when saving your layer package file.
You will need your ESRI Global Account login information, which you most likely created if you installed the Arc10 software on your personal computer. If not, you will need to create an ESRI Global account (you probably did this for the first reading assignment).
Once you have an active account, go to ArcGIS Online and Sign In in the upper right hand corner. Once you are signed in, go to My Content if you aren’t directed there automatically. This is where you can ‘Add an Item’ (i.e. your layer package containing your campground, campsite, and road shape and layer files). Notice that you have 2GB of storage on their server! If you choose to, you can ‘Share’ your layer package with the public or any group you are a member of.
Step 2: Google map
Create an interactive Google map displaying your campground files. (Refer back to Lab 1 Task 3 and the course forum for how-to details.) Remember to include a descriptive title for your interactive map. Consider using the Google map as a device for illustrating campground proximity to surrounding cities…
Step 3: Upload final images of your campground design
Display your map components on your webpage at sizes sufficient for the details to be discernible. Include link to download higher resolution images as pdfs if necessary. See Lab 1 for how-to details.
Step 4: Take Quiz to demonstrate your knowledge of GIS file types.
Quiz will cover layer files, map project documents (mxd files), shapefiles, geodatabases, kml files, map packages, and layer packages. The quiz is un-timed, allows multiple attempts, and your highest score will be recorded.
Take Lab04 Quiz on File Types (have to be logged into Canvas for link to work).